Drawing soap bubbles can be a lot of fun, but coming up with new and exciting ideas isn’t always easy. I get it. You want to create something unique, but you’re not sure where to start.
Well, you’re in the right place. This article is all about söpöjä piirustus ideoita. We’ll dive into a bunch of creative and engaging ways to draw soap bubbles.
Plus, I’ll share some step-by-step instructions and tips to help you along the way. Trust me, by the end, you’ll be brimming with inspiration. Let’s get started!
Understanding Soap Bubbles: Basics and Inspiration
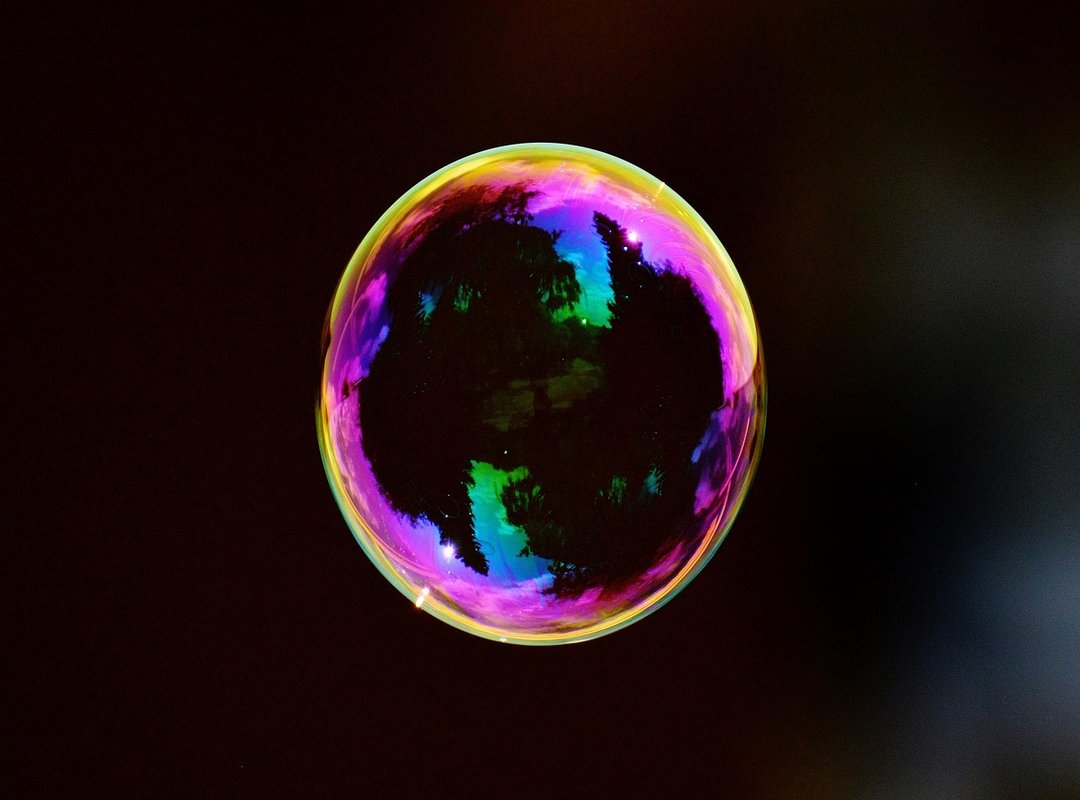
What are soap bubbles? They’re those shiny, round things you see floating in the air. But there’s more to them than meets the eye.
Soap bubbles form when a thin film of soapy water encloses air. The colors you see come from light reflecting off the soap film. It’s like a mini rainbow in every bubble.
Why draw soap bubbles, and for one, they’re visually stunning . There’s something magical about capturing that fleeting, iridescent beauty on paper.
Drawing soap bubbles can also be a great way to practice your art skills. You get to work on shading, reflections, and color blending. Plus, it’s a fun and relaxing activity.
Inspiration from nature is key. When you watch real soap bubbles, you notice how light plays across their surface. How they change shape and color as they float.
This can spark some söpöjä piirustus ideoita for your next drawing.
So, next time you see a soap bubble, take a closer look. You might just find your next artistic inspiration.
Materials and Tools for Drawing Soap Bubbles
Drawing soap bubbles can be a fun and creative activity. Let’s break down what you need to get started.
1, and essential Materials:
- Pencils (HB or 2B are great for sketching)
- Paper (basic sketch paper works well)
- Erasers (a kneaded eraser is handy for gentle corrections)
These basics will help you get your ideas on paper. No need to overcomplicate it at first.
2, and advanced Tools:
If you want to add more detail and color, consider these:
- Colored pencils
- Markers
- Watercolors
These tools can bring your soap bubble drawings to life. But remember, they’re optional. Start simple and build up as you get more comfortable.
3, and choosing the Right Paper:
Paper choice matters, and for basic sketches, any sketchbook will do. If you’re using watercolors, go for thicker, watercolor-specific paper.
It won’t buckle or tear when wet.
Think about what you want to achieve. Are you just doodling or aiming for something more polished? The right paper can make a big difference.
Söpöjä piirustus ideoita can be a great way to spark your creativity. Just grab your materials and start experimenting.
Step-by-Step Guide to Drawing Soap Bubbles
Drawing soap bubbles can be a fun and rewarding experience. Let’s dive in, shall we?
First things first, start with a simple circle. Think of it as the foundation of your bubble, like the base of a house. Add a few initial details, maybe a small highlight or a slight curve to suggest the bubble’s shape.
Next, you’ll want to add depth and reflections. Imagine the bubble as a tiny, curved mirror. It reflects light and the world around it.
Use light, wavy lines inside the circle to mimic these reflections. This step is like adding windows to your house; it lets the light in and makes everything more interesting.
Shading and highlights are key, and picture a spotlight on a stage. The light hits the bubble, creating bright spots and shadows.
Use a soft pencil to gently shade the sides of the bubble, making it look round and three-dimensional. A quick, light touch for highlights will make it pop.
Adding color can really bring your drawing to life. Start with a light blue or purple, blending it softly into the white. It’s like giving your bubble a coat of paint, making it vibrant and eye-catching. Otvpgaming
Remember, practice makes perfect. Söpöjä piirustus ideoita can come from anywhere, even the simplest of shapes. Keep experimenting, and soon you’ll have a whole collection of beautiful, realistic soap bubbles.
Creative Soap Bubble Drawing Ideas
Idea 1: Fantasy Scenes
Incorporating soap bubbles into fantasy landscapes and scenes can really spark the imagination. Think of a magical forest where each bubble is a tiny world, or a mystical underwater kingdom with bubbles as the main characters.
Idea 2: Abstract Art
Using soap bubbles as a basis for abstract and modern art pieces can be a unique twist. The fluid, ever-changing nature of bubbles can inspire dynamic and colorful designs that stand out.
Idea 3: Realistic Portraits
Drawing soap bubbles in a realistic style, focusing on intricate details, can be a real challenge. But it’s also incredibly rewarding. The way light reflects and refracts through the thin, soapy film is just fascinating.
Idea 4: Storytelling
Creating a narrative through a series of soap bubble drawings can be a fun and engaging project. Each bubble could represent a different moment in a story, like a visual diary or a silent comic strip.
söpöjä piirustus ideoita
These ideas are just the tip of the iceberg. There’s so much more you can do with soap bubbles in your art. So, grab your sketchbook and let your creativity flow!
Tips and Tricks for Better Soap Bubble Drawings
Observing real soap bubbles is a game-changer. It helps you capture their essence and the way light reflects off them. Really pay attention to the colors and shapes.
You’ll notice things that photos just can’t show.
Practice and patience are key. Drawing soap bubbles isn’t something you master in a day. It takes time.
Keep at it, and don’t get discouraged if your first attempts look a bit off.
Experiment with different styles and techniques. Try out söpöjä piirustus ideoita and see what works for you. Some artists prefer a more realistic approach, while others go for a whimsical, cartoon-like style.
There’s no one right way to do it.
Don’t be afraid to make mistakes. Each drawing, even the ones that don’t turn out as planned, is a step forward. Embrace the process and learn from each attempt.
FAQs: Common Questions About Drawing Soap Bubbles
Q1: What are the best pencils for drawing soap bubbles?
I remember when I first started, I used whatever pencil was lying around. Big mistake. For söpöjä piirustus ideoita and realistic soap bubbles, you want a set of good quality graphite pencils.
Try a range from 2H to 6B. They give you the control you need for those delicate, translucent effects.
Q2: How do I make my soap bubbles look more realistic?
It’s all about the details, and start by observing real soap bubbles. Notice how light reflects and refracts through them.
Add subtle color gradients and highlights. It can be tricky, but it makes a huge difference.
Q3: Can I use digital tools for drawing soap bubbles?
Absolutely. I switched to digital a few years back, and it’s been a game-changer. Tools like Procreate or Photoshop offer layers and blending modes that make it easier to achieve that perfect, shimmering effect.
Plus, you can experiment without worrying about erasing too much.
Q4: How do I add reflections to my soap bubble drawings?
Reflections are key. Use a light touch with your pencil or brush to add soft, wavy lines inside the bubble. Think of the world around the bubble—what would it reflect?
A window, a tree, or even a face. Keep it subtle; too much detail can ruin the illusion.
Bringing Your Soap Bubble Drawings to Life
This article covers the essentials of creating soap bubble drawings. It includes a step-by-step guide and söpöjä piirustus ideoita. With the right materials, techniques, and a touch of creativity, you can produce beautiful and unique art.
Start by gathering your supplies and following the detailed instructions provided. Experiment with different colors and patterns to make each drawing special. Now, it’s time to start practicing and exploring your own creative ideas.